Proceedings of ASME PVP Conference:
July 2004, San Diego, California
PVP2004-2811
generality
The pipelines currently use Fitness-For-Service (FFS) to accept/remove weld defects. FFS requires accurate measurement of defect height for evaluation according to Fault Mechanics. Standard pipe weld inspection techniques using Radiographs cannot make height assessments. However, new ultrasound techniques can measure and evaluate defect height. Initially ultrasonic amplitude measurement methods were used to measure height, but these methods proved unreliable. Currently other methods such as ultrasonic diffraction, especially Time-Of-Flight-Diffraction (TOFD), are being used in combination to increase accuracy. This article reviews previous work – mainly large nuclear research centers such as PISC II – and size evaluation studies on Pipeline. Size ratings in nuclear plants are best within plus or minus a few millimeters when using ultrasonic diffraction. In contrast to nuclear, AUT for Pipeline uses Zone Discrimination, converging probes, much thinner materials and simpler analysis techniques. Current accuracy typically reaches +1 mm (term not defined), which correlates with beam size and in a particular weld. The requirement of +0.3 mm accuracy is probably not achievable, although future R&D studies should improve this size considerably.
General introduction
Defects always occur when welding, even with the most rigorous processes. In practice, it is impractical to eliminate all defects by repair, so some acceptance criteria must be used to determine which defects should be eliminated and which can be retained. . This work has become even more important with the advent of high-strength steels, which, when chiseled and re-welded often destroy the controlled microstructure; and repairing the weld can create more problems than leaving the defect intact.
Over the past decades, there has been a shift away from the "craftsmanship“, where disabilities are accept or destroy primarily based on what the test system can detect, to “Durable to Service” (FFS) criterion, based on Fault Mechanics (also known as Expert critical assessment, or ECA). FFS uses information about the strength of the material, crack growth data, and the service life of the member to estimated service life and thus judge whether the original defect size is acceptable. Prudence and security are obtained in the calculations by giving margin of error for the inputs: endurance, defect growth rate and defect assessments and measurements. Normally, FFS allows for defects much larger than the acceptance criteria based on workmanship assessment, which reduces failure rates and thereby costs.. However for FFS it is essential that must accurately and reliably measure the main defect parameter: defect height.
In the 1980s, nuclear was at the forefront of defect sizing, and that's where the FFS started. Since automated ultrasound appeared in the gas pipeline industry [1], AUT is becoming the inspection method of choice due to FFS assessments. The use of AUT and FFS in the pipeline industry has resulted in a significant reduction in failure rates (although also partly due to the AUT's ability to exercise control over the welding process).
In the last few decades, the main technique for inspecting pipe welds is to take Radiographs, based on skill assessment. Besides the safety risks, a major shortcoming of radiography is the inability to measure the height of the defect, so FFS cannot be used in these projects. Recently, ultrasound examination has become more popular; Ultrasound provides the ability to measure and evaluate defect height, but this is a difficult measurement in practice and can be subject to many errors. There are two main approaches: based on amplitude and based on diffraction and both approaches will be discussed in this article.
Amplitude vs. Diffraction
Amplitude based
The defect sizing approaches initially base on the amplitude of the returned signal and compare it with a known and pre-machined set of reflections as a engraved groove or edge drilled hole. However, the correlation between defect size and amplitude is still loose[2]; This is nothing new, given the sheer amount of variation from the material itself, the device, and the margin of error. Materials with variable velocity and microstructural variations, especially in steel; equipment capable of amplitude variation due to pulse pattern, frequency range, cable and other electrical parameters.
Perhaps the largest variable is the defect itself Ultrasound is very sensitive to defect direction; In addition, transmittance ratio, roughness, curvature, position also play relevant roles. Conventional ultrasound when examining longitudinal defects is particularly unreliable, although the use of appropriate inspection angles can improve the amplitude criterion [3]. German DGS technique compares defect amplitude with amplitude from a known reflector [4]; this creates a defect “not less than a machined reflector”, and thus unusable for FFS. In general, amplitude-based sizing techniques are often unreliable, certainly by the standards required by the FFS.
Since the majority of defects are still dimensioned using amplitude-based techniques, whether a reduction of 6 dB, 10 dB or 20 dB [5], a few general observations from the experts are appropriate. First, "any defect smaller than the beam tends to be dimensioned by the beam width“. This happens because the Minor defects tend to produce multidirectional feedback, so minor defects can be anywhere inside the beam. However, minor defects tend to be structurally unimportant in most cases, so baseline data on minor defect sizing is limited [6]. Monday, "Small defects tend to be judged larger, and large defects are judged to be smaller than the actual size” [7]. Can easily understand the evaluation”Small defects become big” from omnidirectional reflection and beam propagation. However, "Big and small defects' gets more attention. This situation can easily occur when the defect is bent for example, so the fixed angle probe will extend beyond the edges, making the amplitude and size measurements less than realistic. The size of large defects may be of greater concern for structural integrity.
Diffraction approach
In the late 1970s, Silk at Harwell [8] developed a sizing (and detection) technique called Time of Flight Diffraction (TOFD). This technique uses low amplitude diffracted waves from the defect ends and has been shown to be significantly more accurate than the amplitude method. Fundamentals of TOFD is shown in Figure 1.
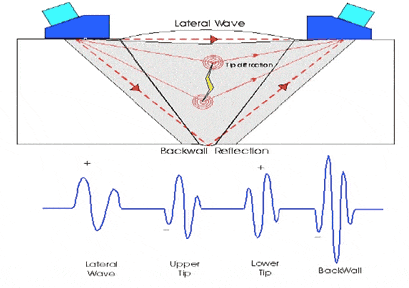
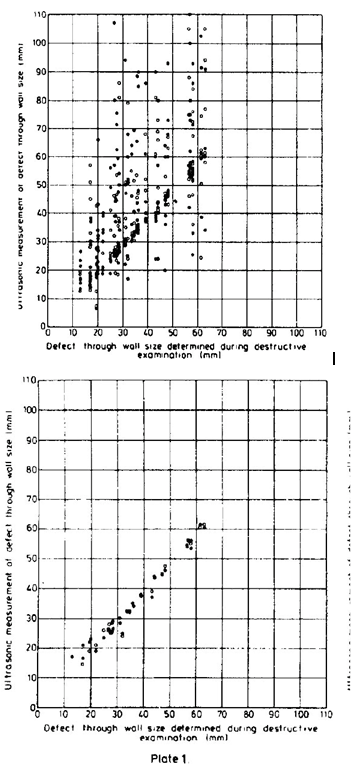
Diffraction is quite common in ultrasound, and several alternative diffraction techniques have been developed with their own advantages and disadvantages. The standard TOFD technique uses a separate pulser and receiver on either side of the weld or member, plus the position is encoded and the data is recorded on a computer. TOFD has significant dead zones in OD and ID, plus problems with interpretation. TOFD is also limited in terms of the smallest defects that this technique can accurately size, due to the ring down duration of the transmitted pulse (about 3 mm for pipes). However, the sizing results using TOFD are impressive. Figure 2 shows a comparison between amplitude-based sizing and TOFD from the defect detection test [9].
Various alternative diffraction approaches have been developed, including back-diffraction and mixed-mode probes. In addition, other techniques based on amplitude and signal have been tried: frequency analysis [10], pattern recognition, HOLSAFT [11]. In general, none of the later techniques has been commercialized, although back diffraction is commonly used.
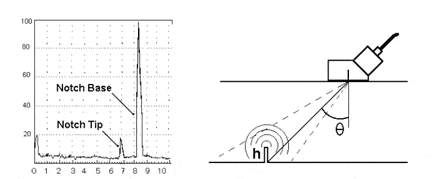
Back diffraction uses a single probe to generate pulses and detect diffracted signals. This makes the system much simpler and allows manual operation. However, the physics of back diffraction is weaker than forward diffraction, and identification of the diffraction head signal can be difficult. However, back diffraction provides the same accuracy as TOFD [12], and has the advantage of sizing small defects (down to 0.5 mm in the pipeline) with smaller dead zones [13]. The basic approach is shown in Figure 3.
Sizing studies in the nuclear industry
While many industries are interested in defect sizing capabilities [14], the nuclear industry has carried out extensive studies to determine defect sizing and detection capabilities. The two main techniques discussed are PISC II and DDT. In particular, test PISC II globally, with about fifty teams examining four components with about two hundred defects [7]. The size and scope of this study allowed good statistical analysis of the results, dimensional accuracy and defect analysis. No wonder the hardest defect to find is a flat crack. However, the size of the trial showed some breakthrough as many new techniques were put to the test. PISC II is the first public trial of TOFD, and the results are encouraging [15]. The overall dimensional accuracy of the UKAEA Risley group is a few millimeters on a sheet hundreds of millimeters thick (i.e. ~1%).
There are significant differences between these nuclear studies and current pipeline size studies:
- First, test PISC II is very large, allowing studies with many significant parameters.
- Second, nuclear pressure vessels are one order of magnitude thicker than pipelines, although it is not possible to increase the ultrasonic frequency used in pipeline inspections due to signal attenuation in the steel.
- Third, the nuclear industry uses TOFD raster and technical Composite Aperture Focus (SAFT), which improves somewhat the accuracy of the petrochemical industry's linear parallel TOFD.
- Fourth, new technologies appear, including better data processing and visualization, new ultrasound techniques such as phased array ultrasound nice TFM/FMC. While phased array ultrasonic testing and TFM are still subject to the physical limitations of sound waves, they allow multi-angle checking, image support, and overall sharpness synthesis.
- Fifth, pipelines typically use converging transducers, which reduce beam size, improve signal-to-noise ratio, and minimize geometry-induced spurious reflections.
- Friday, pipeline defects (d) is usually the same height as the ultrasonic wavelength (λ), which complicates the theoretical analysis.
- Saturday, PISC use flat surfaces on the bottom face, while pipes generally have geometric reflections from the bottom and top.
- Ultimately, the quality required (i.e. time and money spent) for a kernel is often significantly higher than for an onshore pipeline.
However, the general conclusions from nuclear studies apply to pipelines. Sizing and detection using pulse-echoes have limitations; TOFD is good for sizing (and detecting) in most cases, but ideally both TOFD and pulse-echo should be used [15]; It is possible to accurately size a few millimeters (better in the case of pipeline testing).
Pipeline sizing and related terminology
Unlike the extremely expensive PISC II tests, pipeline studies tend to be smaller and more fragmented. Methodological details tend to be sparse and the amount of data is limited. Unfortunately, many pipeline sizing approvals and studies are proprietary and cannot be published in articles or books. The list below contains some of the research findings that have been made public.
For analytical processes, oil pipelines are usually slice and make macros to get an approximate defect size in the weld, unlike the meticulous metallographic method in PISC II. This inherently leads to some errors in sizing and detection; although no data are available, the metallurgical errors appear to be of the same order as the required sizing accuracy. Alternative techniques are freeze-breaking and partitioning at maximum ultrasonic amplitude (probably not maximum depth). Pipeline scans are usually done once (as in real conditions), and scans of freshly welded pipes (unlike kernels). Pipeline sizing is usually just based on partition size by code ASTM E-1961 [16], or a modified version of the amplitude sizing [17]. Partition sizing is quick and approximate, not as detailed as the kernel.
The term for determining the size of a pipe defect is not clear. Usually the defect sizing accuracy is called ±Y mm accuracy. The scientific basis for ±Y mm is not always determined, but may be:
- Maximum error (can be two standard deviations (σ) or 95% result)
- Standard deviation ,
- ASME RMS value or
- A common error range. Some authors specifically cite σ or RMS; in other cases, the procedure usually plots a general error band, usually +1 mm. Very few published works support maximum error because many points are outside the error range, although the literature often mentions this case. Unfortunately, the number of data points in a pipeline study is generally too limited to generate meaningful statistics.
ASME RMS
ASME has a sizing accuracy measurement procedure [18]. The formula for the RMS closely resembles the standard deviation and sums the measurement errors (squared), divides by the number of points, and then takes the square root. The RMS error of the flaw depth should not exceed 3.2 mm.
We refer to Sizing Error, what is it?
Multiple defect sizing error graphs showing an error range of about ±1 mm are plotted above. This ±1 mm range is often quoted because:
- It's a convenient number that's easy to pick and remember;
- The 2 mm range roughly corresponds to the focal size of the pipeline AUT probe, so more precise sizing is problematic;
- The 2 mm range also corresponds to typical pipe area sizes and GMAW welds;
- There may be too few data points for statistically significant; and
- Most of the data points are in this range, especially the large size.
Physical limit
As the size of the defect approaches the wavelength length (0.4-0.5 mm for 7.5 MHz waves), physics becomes an issue for the modeling of defects in the weld. pipeline. (Typical pipeline weld defects are in a single weld layer, ie 1-3 mm.) There are two approaches to the study: analytic and arithmetic.
Analytical – Analytical
Analytical methods, often using ideal cracks, and using Green's theorem, Kirchoff's approximation, Born's approximation, and the General Theorem of Diffraction [19]. Unfortunately, all of these analytical methods use approximations to make the equations solvable, and these approximations are not valid when the defect size is similar to the wavelength in the field. pipeline assembly. Therefore, analytic theory cannot solve this problem, although it is clear that ultrasound is reflected in practice from defects with d ~.
Numerology – Numerical
Among the various methods of performing arithmetic evaluation, ray tracing or ray tracing is essentially useless for d ~ λ. The finite element method and the finite difference method will be usable, although approximations are still involved. Unfortunately, both FEM and FDM are very time consuming and expensive [20] and very little work has been done in this area.
Focal Spot Size
Another important factor is the minimum achievable focal spot size, especially as the minimum measurable defect size can be limited by the focal size [6]. Theoretical focal size depends on aperture size, frequency (i.e. wavelength) and focal distance. If assuming a 16mm aperture, 7.5MHz, and a 20mm focal distance in water (i.e. a very short focal point), the half-width in 6 dB advances to 2λ or 1mm. This suggests that defects cannot be less than +0.5 mm in size [20]. This correlates with the accuracy of the current sizing from techniques such as back diffraction [13], and the laboratory results have been optimized [21].
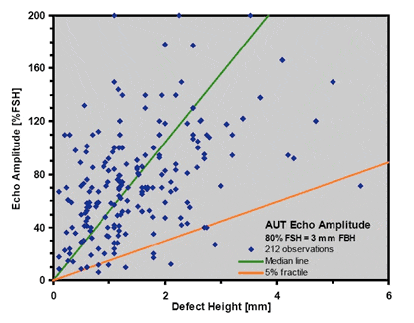
In contrast, there is a school of pipeline conception that considers too small a focal point to be detrimental [4, 17], especially using the amplitude approach. However, these results show looser sizing accuracy compared with partitioning and other approaches (see below). There are also significant limitations to amplitude engineering, for example, the defect must be centered in the beam and must be smaller than the beam. The correlation between signal amplitude and defect size is very poor (see for example Figure 4).
Studies on defect sizing for Pipeline
Read more original post link subject with more information.
More discussion
In fact, except for the results of Oceaneering and EWI studies, the available data are quite similar, with RMS and usually above 1 mm. Much of the data can be represented without serious distortion, suggesting that the important issue is technology limitations and not operator or equipment experience. Average error is usually less than 1 mm, with limited size. At this point, most evidence suggests that sizing accuracy greater than σ ± 1 mm is impractical. The dataset from R/D Tech (Now owned by Olympus) shows that the ±1 mm “range of error” is actually the RMS or standard deviation <± 1 mm. However, the data cannot be compared because of different test conditions, different AUT procedures, different partitioning, etc. In general, the average sizing error is small, usually close to 0mm.
Diffraction techniques offer more potential than amplitude techniques, although TOFD in particular has limitations with smaller defects (and near-surface defects). Relying on amplitude techniques alone will usually give dimensional accuracy for focal diameter (~2 mm, or ±1 mm error as found in recent studies), with exceptions usually occurs. The allocation margin does not improve the value of σ much. Size reduction is generally not a big deal. In principle, TOFD should reduce the total number of failures.
Current claims for defect size to ±0.3 mm accuracy seem unrealistic from these published results. There is no evidence that unpublished (or proprietary) results show any significant improvement. On nuclear materials using a much shorter λ and perfect geometry, a repeatability accuracy of ±0.1 mm was achieved [32]. However, such ultrasonic frequencies are not usable in ferritic steels, which are more microstructurally limited. Although some work has been done on the limits of ultrasound in steel [33], more research is needed on piping materials using AUT.
From the perspective of FFS, the best solution with current technology is add ±1mm to ±1.5mm to all size estimates for safety redundancy; For larger defects, the best solution is to use more than one technique to avoid possible larger-than-life evaluation (5 mm or more) [22]; zoning, TOFD, back diffraction, and multi-angle testing are often used [6] if time permits (especially for load points and tendons). Unfortunately, spot tests can be significantly less reliable than lab tests. Although recent results (Oceaneering and EWI) are significantly better than previous results (Shell and Advantica).
Fortunately, work is underway on alternative and improved sizing techniques. R/D Tech and now Olympus are working on several improvements:
- Back diffraction [13]: This technique is capable of measuring defects down to ±0.5 mm, although it has not been proven in tests. The main problems are determining the correct signal and resolving the ringdown time.
- TOFD Signal Processing [34]: This technique decodes the TOFD signal to allow sizing of smaller defects. Initial results are encouraging, but like all DSP techniques, errors can occur.
- Focus improvement [35]: The increased number of elements and matrix arrays reduces focal size and improves sizing accuracy.
Conclusion
- Pipeline defect sizing using AUT is becoming more important as Fitness-For-Purpose is used more and more, especially for outboard ribbing and lifting devices.
- In general, TOFD gives better sizing than amplitude methods, although TOFD is severely limited for small and near-surface defects.
- The few existing pipeline studies show fairly consistent results, despite differences in processes. With one or two exceptions, the accuracy ranges are fairly consistent, although better knowledge of the processes may explain some of these points.
- Studies consistently show a tendency to evaluate larger than life size rather than smaller, which is understandable considering the assessment of minor defects.
- The pipeline industry does not use the strict terminology or data analysis as practiced in the nuclear industry, so the accuracy quoted is usually free of standard deviation, RMS, approximation, or other variables. similar calculation.
- Average sizing error is usually less than 1 mm, with random sizing error.
- Most studies show dimensional errors to be within ±1 mm or more; σ to ± 2 mm, with some exceptions, depending on defects, conditions, etc.
- There is no published evidence that an accuracy of ±0.3 mm can be achieved in the field.
- Several innovative techniques are under study that will significantly improve sizing.
Thank you
Mr. Ed Ginzel of Materials Research Institute, Waterloo, Ontario provided valuable advice and assistance. Oceaneering OIS provided proprietary data submitted to DNV.
References
[1] Ginzel EA, 2000, “Mechanized Ultrasonic Inspections of Pipeline Girth Welds – A Brief History”, NDT.net, 2000, Vol 5. No. 03, http://www.ndt.net/article/v05n03/eginzel/eginzel.htm[2] Gruber GJ, GJ Hendrix and WR Schick, 1984, “Characterization of Flaws in Piping Welds using Satellite Pulses”, Materials Evaluation, Vol. 42, p. 426.
[3] Bray AV and RK Stanley, 1995, “An Analysis of UT Amplitude Comparison Flaw Sizing and Dissection Results in Steel Pipe”, NDE-Vol 13, NDE for the Energy Industry, ASME, p. 85.
[4] Dijkstra FH, J. eg Ent and TJ Bouma, 2000, “Defect Sizing and ECA: State of the Art in AUT”, Pipeline Technology Conference, Brugges, 21-24 May.
[5] Ismail MP and AB Muhammad, 1998, “Defect sizing by ultrasonic ANDSCAN”, Insight vol. 40, no. 11, p. 769.
[6] Murphy RV, 1987, “Ultrasonic Defect-Sizing using Decibel Drop Methods, Vol 1: Text”, Atomic Energy Control Board Project No. 85.1.9, Canada.
[7] PISC, 1997, Welding Research Council Bulletin 420, Abstracted by SH Bush, Ch. 7.
[8] Silk MG, 1979, “Defect Sizing using Ultrasonic Diffraction”, British Journal of NDT,, p. twelfth.
[9] Charlesworth JP and JAG Temple, 1989, “Ultrasonic Time of Flight Diffraction”, Research Studies Press.
[10] Adler L., KV Cook, HL Whaley and RW McClung, 1977, “Flaw Size Measurement in a Weld Sample by Ultrasonic Frequency Analysis”, Materials Evaluation, p. 44.
[11] Schmitz V., W. Müller and G. Schäfer, 1984, “Flaw Sizing and Flaw Characterization with HLOSAFT”, Materials Evaluation, Vol. 42, p. 439.
[12] Baby S., T. Balasubramanian and RJ Pardikar, 2002, “Estimation of the height of surface-breaking cracks using ultrasonic methods”, Insight vol. 44 no. 11, p. 679.
[13] Jacques F., F. Moreau and E. Ginzel, 2003, “Ultrasonic Backscatter Sizing Using Phased Array -Developments in Tip Diffraction Flaw Sizing”, submitted to Insight.
[14] Zippel W., J. Pincheira and GA Washer, 2000, “Crack Measurement in Steel Plates using TOFD Method”, Journal of Performance of Constructed Facilities, p. 75.
[15] Highmore PJ, A. Rogerson and LNJ Poulter, 1988, “The Ultrasonic Inspection of PISC II Plate 2 by the Risley Nuclear Laboratories”, British Journal of NDT, p. 9.
[16] ASTM 1998, E 1961-98, “Standard Practice for Mechanized Ultrasonic Examination of Girth Welds Using Zonal Discrimination with Focused Search Units”, American Society for Testing and Materials.
[17] Gross B., Dr. Connelly, H. van Dijk and A. Gilroy-Scott, 2001, “Flaw sizing using mechanized ultrasonic inspection on pipeline girth welds”, NDT.net, Vol. 6, No. 7.
[18] ASME, 2001, “Performance Demonstration for Ultrasonic Examination Systems”, Appendix VIII, p. 331, American Society of Mechanical Engineers.
[19] Kraut EA, 1976, “Review of Theories of Scattering of Elastic Waves by Cracks”, IEEE Transactions on Sonics and Ultrasonics, Vol. SU-23, No. 3, p. 162.
[20] Mair HD, 2003, private communication, 2003.
[21] Lozev M., 2002, “Validation of Current Approaches for Girth Weld Defect Sizing Accuracy by Pulse-Echo, Time-Of-Flight Diffraction and Phased Array Mechanized Ultrasonic Testing Methods”, EWI Project No. 45066CAP.
[22] Förli O., 2002, “Qualification of AUT for Offshore Pipelaying and the Role of NDT”, 3rd European-American Conference on NDT Reliability and Demining”, Berlin, 10-13 September.
[23] Heasler PG and SR Doctor, 1976, “Piping Inspection Round Robin”, NUREG/CR-5068, PNNL-10475.
[24] Denys R., T. Lefevre, C. de Jaeger, S. Claessens, 2000, Study on “Weld Defect Acceptance Criteria”, Final report for a group of sponsors, Laboratorium Soete, Gent, Belgium, May 2000.
[25] Morgan L., 2002, “The Performance of Automated Ultrasonic Testing (AUT) of Mechanised Pipeline Girth Welds”, 8th ECNDT, Barcelona. Also, www.ndt.net/article/ecndt02/morgan/morgan.htm
[26] Morgan L., P. Nolan, A. Kirkham and P. Wilkinson, 2003, “The use of automated ultrasonic testing (AUT) in pipeline testing”, Insight November.
[27] Kopp F., G. Perkins, G. Prentice, D. Stevens, 2003, “Production and Inspection Issues for Steel Catenary Risers”, Offshore Technology Conference, Houston, 5-8 May 2003.
[28] Cataldo G. and R. Legori, 2003, “Advanced Ultrasonic Techniques in Pipeline Girth Welds Examination”, ASME PVP-Vol. 456, Paper number PVP2003-1852, p. 49.
[29] Sjerve E., DC Stewart and GF Bryant, “Comparison of Multi-Probe and Phased Array Girth Weld Inspection Systems”, IPC 2000, ASME 2000 International Pipeline Conference, Calgary, Alberta, October 1-5, 2000, page 827830 .
[30] Oceaneering International, 2003, private communication.
[31] Förli O., 2003, private communication.
[32] Lindenschmidt K. and M. Moles, 1991, “Crack Depth Measurements in Thin-Walled Tubing by Time-Of-Flight”, Review of Progress in Quantitative NonDestructive Evaluation, Vol. 11, p. 2093.
[33] Mudge PJ, 1981, “Size Measurement and Characterization of Weld Defects by Ultrasonic Testing”, Part 3: The effect of metallurgical features in ferritic steels”, The Welding Institute Reference 3527/11/81.
[34] Honarvar F., T. Dusatko, Y. Fan, F. Farzbod, M. Moles and AN Sinclair, 2003, "A novel signal processing technique for enhancement of time-of-flight diffraction (TOFD) signals", ICPIIT VIII, Houston, June 18-21, 2003.
[35] GTI, 2003, Gas Technology Institute Project “Control of Horizontal Beam Width with Phased Array Transducers RPTG-0334”, by R/D Tech.
